New Generation Computer Vision: AWS DeepLens
New Generation Computer Vision: AWS DeepLens
How to deploy an object detection model by using AWS DeepLens

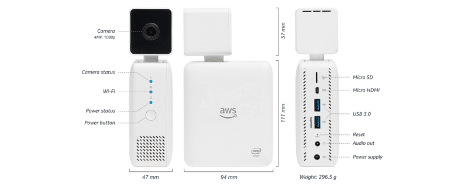
AWS DeepLens is a programmable video camera that enables developers to get started to practice on deep learning techniques in a less amount of time. Inside of AWS DeepLens, Intel Atom® Processor as a CPU, Intel Gen9 Graphics Engine as GPU, Ubuntu OS-16.04 LTS as OS. In addition to these features, it has 4 MP camera (1080P), 8GB RAM, 16GB expandable memory, Dual-band Wi-Fi, Intel® Movidius™ Neural Compute Stick, and Intel® RealSense™ depth sensor. Below, you can find its dimensions, audio out, micro HDMI display port, and USB ports in a depicted way.
Currently, it can only be shipped to these eight countries: US, UK, Germany, France, Spain, Italy, Canada, Japan. If you are outside of these 7 countries, you might consider ordering one of these countries and pick it up from this location.
Three different types of modeling are possible to be deployed to AWS DeepLens. In this post, we will be working on the Pre-Trained Object Detection model.
1. Pre-Trained Model
This project enables users to deploy an initially trained model to their devices. It can be selected by the following path of Projects > Create project
2. Amazon SageMaker trained model
With this model type, you can create and train your models in AWS SageMaker and provide their following information and then click on Import button: “Job ID”, “Model name”, “Model framework”.
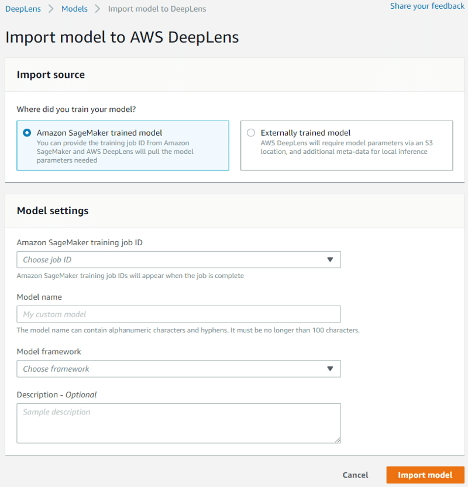
To be able to deploy your models into your device by using this model type, AWS Sagemaker is a required service to open up a SageMaker Notebook instance as a code editor.
If you are new to AWS services and have never used AWS SageMaker before, AWS serves you an AWS Free Tier. By using this account, you can get started to use AWS SageMaker for the first two months. In this two month period, the following usages will be free by monthly basis with AWS Sagemaker:
- Building models: 250 hours of t2.medium or t3.medium notebook usage
- Training models: 50 hours of m4.xlarge or m5.xlarge for training
- Deploying models (real-time & batch transform): 125 hours of m4.xlarge or m5.xlarge
Note that the month you initiated the AWS SageMaker instance will be the month of the beginning of your free tier.
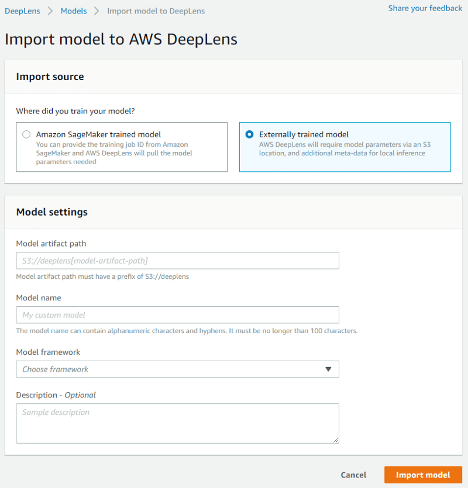
3. Externally Trained Model
By choosing this type of model, it is expected that you already trained your model outside of the AWS environment and uploaded your model into an AWS S3 bucket. To be able to upload your model to DeepLens, you are required to fill the following fields and then click on Import button: “Model artifact path”, “Model name”, “Model Framework”.
AWS DeepLens
Before start using any service, necessary permissions shall be set as in the link to be able to properly use them. The first service that will be used is AWS DeepLens. To be able to use this service, your region shall be selected among one f these regions:
Europe (Frankfurt) eu-central-1
US East (N. Virginia) us-east-1
Asia Pacific (Tokyo) ap-northeast-1
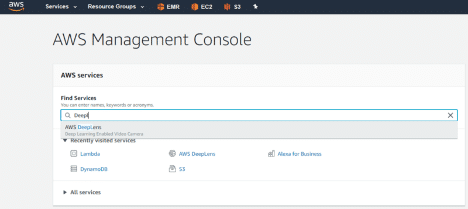
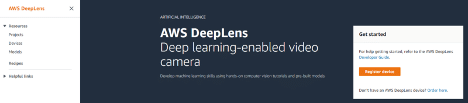
After setting up development environment policies and regions, by using AWS Management Console, under the “Find Services” heading, you will be able to quickly find any services by using the search button by typing the name of the service as shown below.
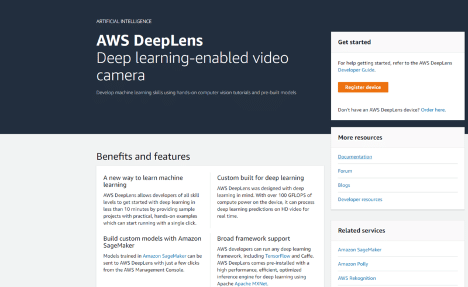
This page includes basic pieces of information about the service. For more detailed technical details, you can visit “Documentation” under the “More Resources” tab.
Device Registration
When the product is unboxed, the first thing step is to properly register your device into the AWS DeepLens service.
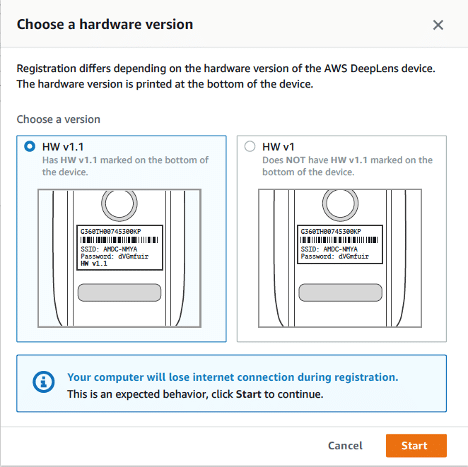
After you connect your device to your PC, click on “Register device” button, then select your hardware version and click on “Start” button as shown in the figure below.
As a first step, the device shall be connected to the power source by using its adapter and turn on the power button. When the device is on, power led will turn into blue color.
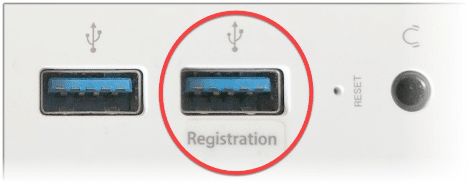
You can connect your PC with your device by plugging in the USB cable to the device’s “Registration” port.
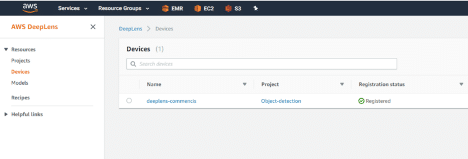
When you can successfully registered AWS DeepLens, you will be able to see your device under Resources > Devices tab on the left-hand side of the page by having a “Registered” status.
Deploying a Pre-Trained Model
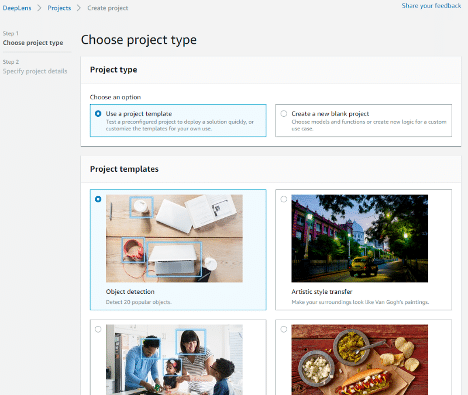
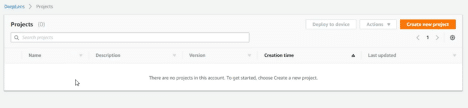
Under “Projects” section, you need to click on the “Create new project” button that is located on the top right to be able to see the project types.
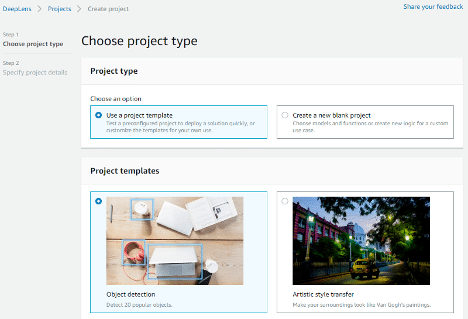
In this step, one of the pre-populated project templates needs to be chosen. Choose “Use a project template” as the project type and choose the “Object detection” from the list and scroll down to screen to click on “Create”.
In the “Specify project details” page, accept the default values in the project name and description feeds.

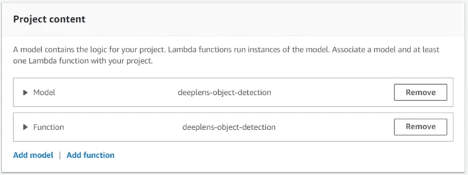
On the bottom of the same page, you will be viewing the Project Content selection settings. Both for Model and Function, accept the default values and click on “Create” to continue.
In this step, you will deploy the object detection project to your device. Your currently created project shall be listed successfully in the “Projects” section. After you view the corresponding project, click on the radio button and choose “Deploy to device” on the right top.

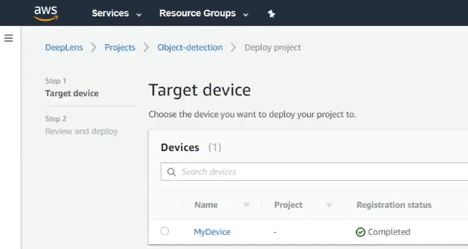
On the “Target device” page, you need to choose your device and click on the “Review” button.
There will an additional page that has details of your deployment including information about “Type”, “Lambda” and “Model”. After you carefully check them, select the “Deploy” button to continue.

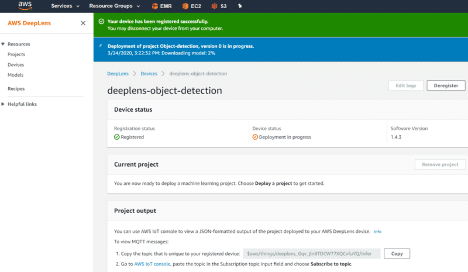
When clicked on “Deploy” your model will be uploaded to your device by showing its download percentage to AWS DeepLens.
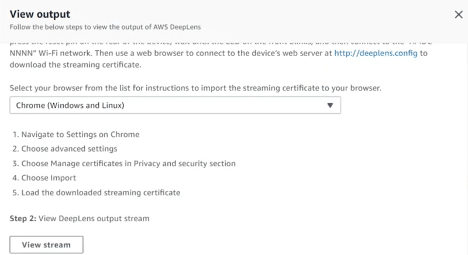
After deployment, on the “Devices” tab, after your project deployment, click on “View Output” to select your browser for the corresponding streaming certification import.
Model Output
There are 2 different ways to view our model output. These are listed below and explained in separate topics.
- JSON-formatted MQTT topic-valued output
- Project Stream
1.AWS IoT Core — MQTT Topic Value
After you successfully imported your certificate, your browser will ask you to choose the appropriate version of your certificate via the pop-up screen.
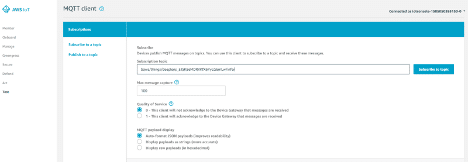
When you would like to have a JSON-formatted output, you may “Copy” the uniquely generated topic and click on “AWS IoT console” to open up the AWS IoT Core service.
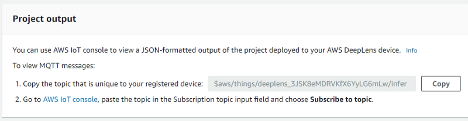
After copying the topic with the following format “$aws/things/deeplens_/infer”, paste it under “Subscribe to topic” and click on “Publish to topic” button.
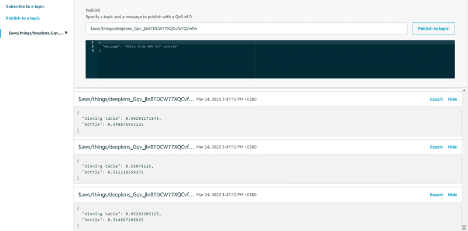
After clicked on “Publish to topic”, json-formatted outputs started to be published. If you would like to stop publishing, you can select “Pause” on the right top.
2.Project Stream
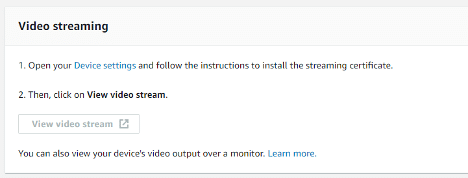
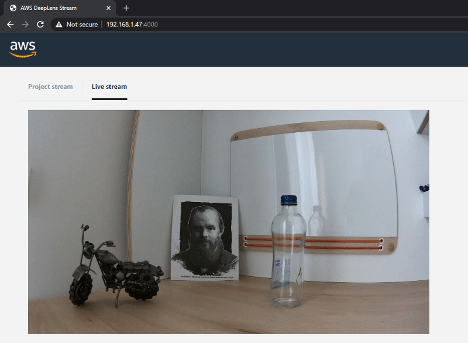
After the certificate for our browser is imported, we can click on the “View video stream” under the “Video streaming” section to open a new tab with the IP address “192.168.1.47:4000″.
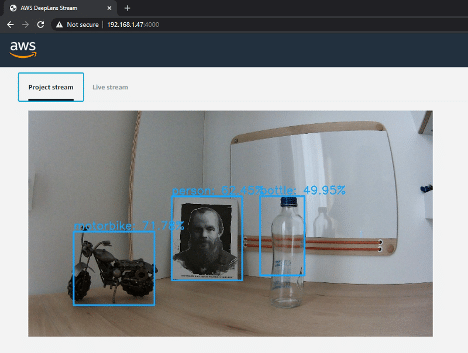
When the stream is enabled on the IP address specified, we can see two different tabs. The first tab is called “Project stream” which is the stream where our object detection model was applied. On this stream, we see blue frames around the objects and on the top of the frames, detected names of the objects with their likelihood percentages. Not all of the objects in the frame can be recognized since the model was trained in a limited amount of objects. If we would like to detect more objects than the pre-trained object detection model, we need to import our custom model by importing an external custom model.
The second stream is called “Live Stream”. When we select this tab, we can view the normal camera stream which shows frames faster than “Project Stream” since it is not applying any model on the objects.
Reading Time: 9 minutes
Don’t miss out the latestCommencis Thoughts and News.

17/04/2020
Reading Time: 9 minutes
How to deploy an object detection model by using AWS DeepLens
Don’t miss out the latestCommencis Thoughts and News.
AWS DeepLens is a programmable video camera that enables developers to get started to practice on deep learning techniques in a less amount of time. Inside of AWS DeepLens, Intel Atom® Processor as a CPU, Intel Gen9 Graphics Engine as GPU, Ubuntu OS-16.04 LTS as OS. In addition to these features, it has 4 MP camera (1080P), 8GB RAM, 16GB expandable memory, Dual-band Wi-Fi, Intel® Movidius™ Neural Compute Stick, and Intel® RealSense™ depth sensor. Below, you can find its dimensions, audio out, micro HDMI display port, and USB ports in a depicted way.
Currently, it can only be shipped to these eight countries: US, UK, Germany, France, Spain, Italy, Canada, Japan. If you are outside of these 7 countries, you might consider ordering one of these countries and pick it up from this location.
Three different types of modeling are possible to be deployed to AWS DeepLens. In this post, we will be working on the Pre-Trained Object Detection model.
1. Pre-Trained Model
This project enables users to deploy an initially trained model to their devices. It can be selected by the following path of Projects > Create project
2. Amazon SageMaker trained model
With this model type, you can create and train your models in AWS SageMaker and provide their following information and then click on Import button: “Job ID”, “Model name”, “Model framework”.
To be able to deploy your models into your device by using this model type, AWS Sagemaker is a required service to open up a SageMaker Notebook instance as a code editor.
If you are new to AWS services and have never used AWS SageMaker before, AWS serves you an AWS Free Tier. By using this account, you can get started to use AWS SageMaker for the first two months. In this two month period, the following usages will be free by monthly basis with AWS Sagemaker:
- Building models: 250 hours of t2.medium or t3.medium notebook usage
- Training models: 50 hours of m4.xlarge or m5.xlarge for training
- Deploying models (real-time & batch transform): 125 hours of m4.xlarge or m5.xlarge
Note that the month you initiated the AWS SageMaker instance will be the month of the beginning of your free tier.
3. Externally Trained Model
By choosing this type of model, it is expected that you already trained your model outside of the AWS environment and uploaded your model into an AWS S3 bucket. To be able to upload your model to DeepLens, you are required to fill the following fields and then click on Import button: “Model artifact path”, “Model name”, “Model Framework”.
AWS DeepLens
Before start using any service, necessary permissions shall be set as in the link to be able to properly use them. The first service that will be used is AWS DeepLens. To be able to use this service, your region shall be selected among one f these regions:
Europe (Frankfurt) eu-central-1
US East (N. Virginia) us-east-1
Asia Pacific (Tokyo) ap-northeast-1
After setting up development environment policies and regions, by using AWS Management Console, under the “Find Services” heading, you will be able to quickly find any services by using the search button by typing the name of the service as shown below.
This page includes basic pieces of information about the service. For more detailed technical details, you can visit “Documentation” under the “More Resources” tab.
Device Registration
When the product is unboxed, the first thing step is to properly register your device into the AWS DeepLens service.
After you connect your device to your PC, click on “Register device” button, then select your hardware version and click on “Start” button as shown in the figure below.
As a first step, the device shall be connected to the power source by using its adapter and turn on the power button. When the device is on, power led will turn into blue color.
You can connect your PC with your device by plugging in the USB cable to the device’s “Registration” port.
When you can successfully registered AWS DeepLens, you will be able to see your device under Resources > Devices tab on the left-hand side of the page by having a “Registered” status.
Deploying a Pre-Trained Model
Under “Projects” section, you need to click on the “Create new project” button that is located on the top right to be able to see the project types.
In this step, one of the pre-populated project templates needs to be chosen. Choose “Use a project template” as the project type and choose the “Object detection” from the list and scroll down to screen to click on “Create”.
In the “Specify project details” page, accept the default values in the project name and description feeds.
On the bottom of the same page, you will be viewing the Project Content selection settings. Both for Model and Function, accept the default values and click on “Create” to continue.
In this step, you will deploy the object detection project to your device. Your currently created project shall be listed successfully in the “Projects” section. After you view the corresponding project, click on the radio button and choose “Deploy to device” on the right top.
On the “Target device” page, you need to choose your device and click on the “Review” button.
There will an additional page that has details of your deployment including information about “Type”, “Lambda” and “Model”. After you carefully check them, select the “Deploy” button to continue.
When clicked on “Deploy” your model will be uploaded to your device by showing its download percentage to AWS DeepLens.
After deployment, on the “Devices” tab, after your project deployment, click on “View Output” to select your browser for the corresponding streaming certification import.
Model Output
There are 2 different ways to view our model output. These are listed below and explained in separate topics.
- JSON-formatted MQTT topic-valued output
- Project Stream
1.AWS IoT Core — MQTT Topic Value
After you successfully imported your certificate, your browser will ask you to choose the appropriate version of your certificate via the pop-up screen.
When you would like to have a JSON-formatted output, you may “Copy” the uniquely generated topic and click on “AWS IoT console” to open up the AWS IoT Core service.
After copying the topic with the following format “$aws/things/deeplens_/infer”, paste it under “Subscribe to topic” and click on “Publish to topic” button.
After clicked on “Publish to topic”, json-formatted outputs started to be published. If you would like to stop publishing, you can select “Pause” on the right top.
2.Project Stream
After the certificate for our browser is imported, we can click on the “View video stream” under the “Video streaming” section to open a new tab with the IP address “192.168.1.47:4000″.
When the stream is enabled on the IP address specified, we can see two different tabs. The first tab is called “Project stream” which is the stream where our object detection model was applied. On this stream, we see blue frames around the objects and on the top of the frames, detected names of the objects with their likelihood percentages. Not all of the objects in the frame can be recognized since the model was trained in a limited amount of objects. If we would like to detect more objects than the pre-trained object detection model, we need to import our custom model by importing an external custom model.
The second stream is called “Live Stream”. When we select this tab, we can view the normal camera stream which shows frames faster than “Project Stream” since it is not applying any model on the objects.