How to Build a Usability LabAnytime, Anywhere
20/09/2018
Have you ever seen or conducted a conventional usability test where users sit in a room and use a product as others observe them in another room? While it is undoubtedly one of the best ways to gain insights about your product, frankly the process is a little bulky and has little to no room for mobility. We, as well as most other companies that provide this service, usually have entire rooms and complex technical infrastructure built especially for this task.
Having this facility makes the process a lot smoother, but completely relying on it may sometimes be a limitation. For example, one day, we had to leave the comfort of our usual set-up and conduct tests in a client’s office, which doesn’t have a dedicated test lab. The challenge was real – how do you reconstruct that perfectly-created environment from the ground up, and probably?
When our UX team had to run a usability test in a remote location, we worked on ways to figure out how to run a professional test away from our office, while still keeping the fundamental elements of a test environment. And as it turns out, you can do exactly that with everyday equipment you can find lying around in any office. Here’s how…
Setting It Up
There is no one-size-fits-all solution when it comes to usability test. You can get creative and adapt the most suitable solution for your specific scenario. To save you some time, we listed a few simple and quick solutions for three core observations points: the interface, the interactions, and the facial expressions.
You will need to have 100% visibility on the tasks participants carry out on the interface, how they interact with the system, and how they feel as they carry out the tasks. If you are not at the comfort of your usual set up, you will come across different challenges and problems along the process. This post will help you tackle these challenges one by one and create your own test lab in almost any office environment, without busting the bank.
1) Interface
First, you need to capture what the participants see on the screen. You can achieve this by streaming participants’ screen to another device. You can then observe and record it in any way you prefer. There are many ways to mirror a screen on to another device. Especially when testing with mobile devices, you can find countless products that turn your PC to a wireless receiver (AirPlay for iOS devices and Google Cast for Android devices) for very affordable license fees. You can also connect your device to a PC using a USB cable. You can then mirror displays without any need for third-party applications if the operating systems are matching (It’s free to connect and stream an iOS device to a MacOS or an Android device to Windows).
You should also keep in mind that if you are running a test on multiple operating systems (e.g. iOS and Android tests for the same product) consistency is essential. The test environment, prototyping, and streaming tools should be as similar as possible -preferably identical- to achieve an unbiased result. Reflector and AirServer, for example, support both iOS and Android streaming and can help you tackle this challenge very effectively. So, based on your needs, you can operate this task either for free or pay approximately $20 for licenses.
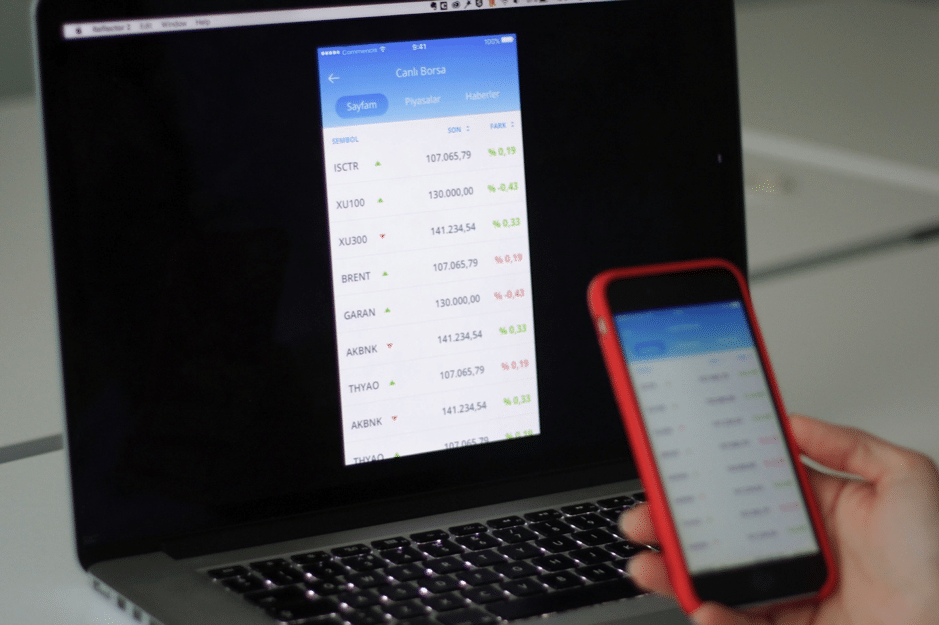
iPhone’s screen is mirrored to an empty desktop via Reflector
2) Interaction
Observing the interface is important. However, the behavioral data about how they get there is critical. You will find key insights by analyzing the interaction between users and the system. Placing a camera that captures the participant’s hands while they interact with the system ensures you’re not missing anything. There are specialized document cameras that would serve well for this purpose. Getting one will save you from dealing with resolution, lighting and auto-focus issues. But you can use any recording device if you can manage to place it correctly and tweak a few settings. Turning off auto-focus is important as you don’t want the camera to keep refocusing every time participant moves their hands. As for placement, we recommend setting a boundary box, marking it clearly on the table and asking participants to use the device any way they like as long as it’s within the boundaries. Then place a camera pointing in that direction making sure it covers every part of the boundary box.
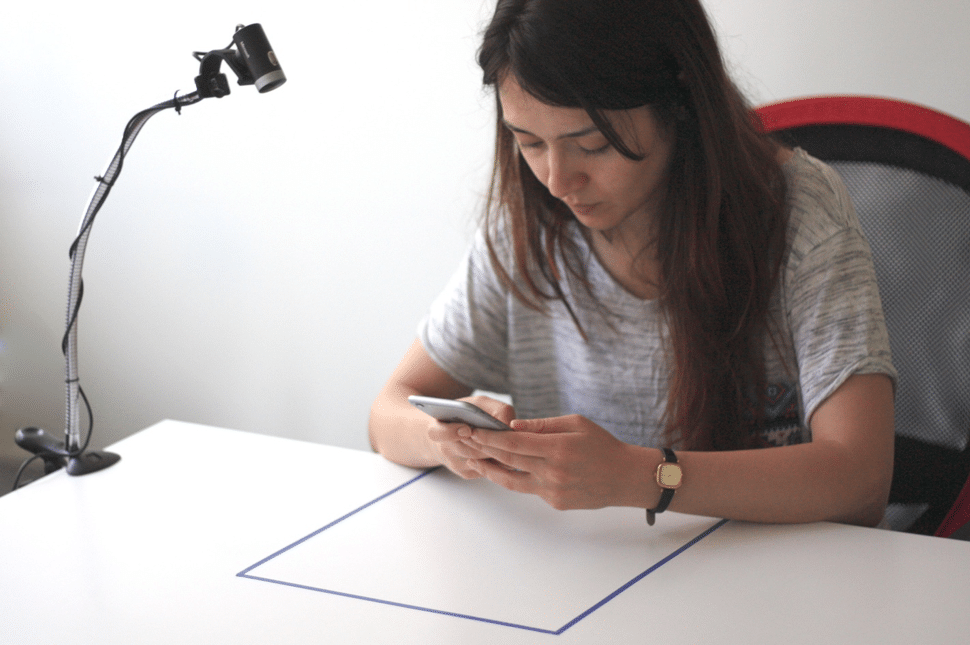
Webcam pointed at the boundary box to capture interactions
3) Expressions
Facial expressions will help you identify the participants’ emotions throughout the test. These are critical behavioral data – regardless the participant completes the tasks or not. Placing a camera right in front of participants’ face may not be the best solution to capture expressions. Even though they are aware of being recorded, making it extremely obvious will make them feel uncomfortable and will lead to unnatural behavior (naturally!). Recording in a test environment must be as subtle as possible to help your participants feel comfortable. Small action cameras may be a good solution considering their size. Also, their wide angle lenses will allow you place them strategically. Since we are going for the simplest – yet most effective – possible solution here, using the built-in webcam of a laptop can save you from adding another device to an already complex system of interconnected devices. Everyone is used to seeing a laptop, so it is your best bet. Here, the placement of the laptop is important. It should be placed close enough to capture facial expressions but not too close to distract the participant. The laptop’s screen shouldn’t be visible for participants, which can be achieved by setting the brightness to minimum.
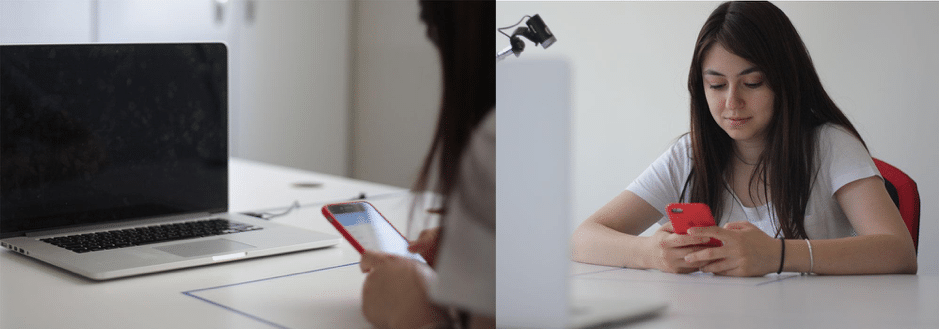
Capturing expressions with MacBook’s built-in camera
Bringing It All Together
The main idea behind this system is synchronization. None of these inputs mentioned above are individually recorded. Whatever device or camera you decided to go with, all the input need to be streamed to the main recording device. Mirror all the input you decided to capture on to an empty desktop and you’ll have your main observation dashboard that displays all the data you need, in sync. At this point, you can record the entire screen for a single synced output, you can mirror the screen to other devices in your office or even outside of your office via screen sharing utilities.
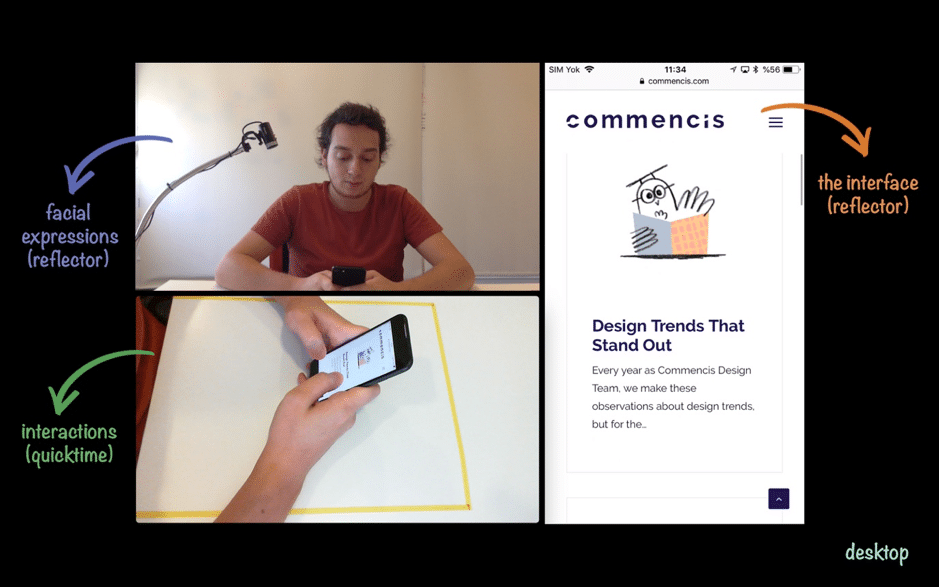
Main dashboard displays all three input together in sync
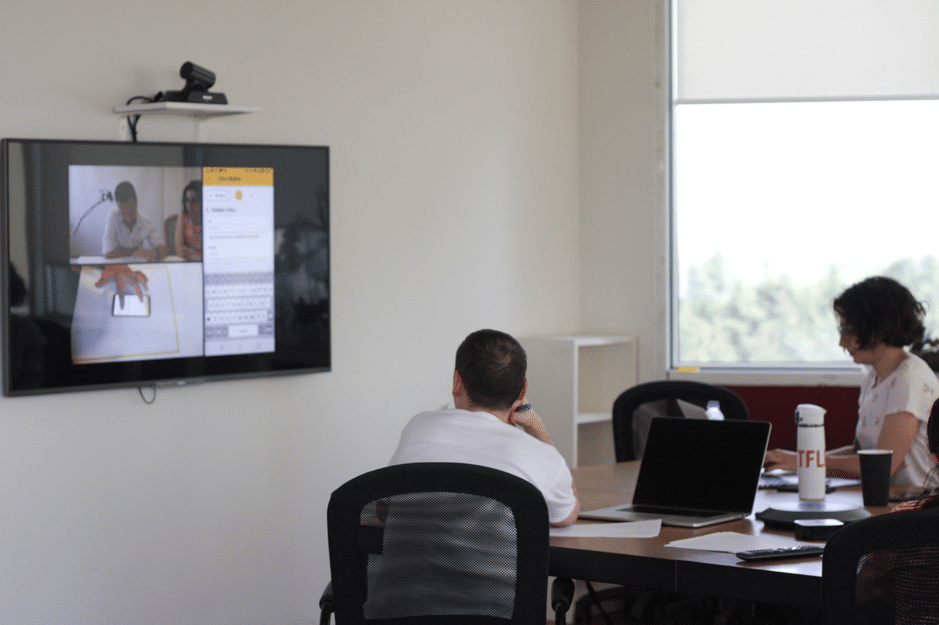
Main dashboard streamed live to a viewing room via Apple TV
With a little bit of imagination and teamwork, there’s no limit to things you can do with all the information you are collecting from this simple, efficient and versatile test lab you just built. This is Sarp – UX Designer at Commencis. Please comment or contact me if you have any questions or recommendations.
Questions? Get in touch hello@commencis.com