Guide to Setting Up an AWS Free Test Environment: Building a Free Platform
Guide to Setting Up an AWS Free Test Environment: Building a Free Platform
AWS’s free offerings are an invaluable opportunity to gain experience in the tech world and you can quickly advance your development skills.
This guide will walk you through creating a free test environment with Amazon Web Services, demonstrating step-by-step how to utilize the complimentary AWS platform. If you’re ready, let’s get started!
First Step: Let’s Create an AWS Account
To get started with AWS, you first need to create an AWS account.
Go to the AWS website and click “Create Account”.

Fill in the root mail and account name fields and verify the incoming activation mail.

After verifying the mail, we need to enter the requested information consisting of 5 steps. Once the account creation process is complete.

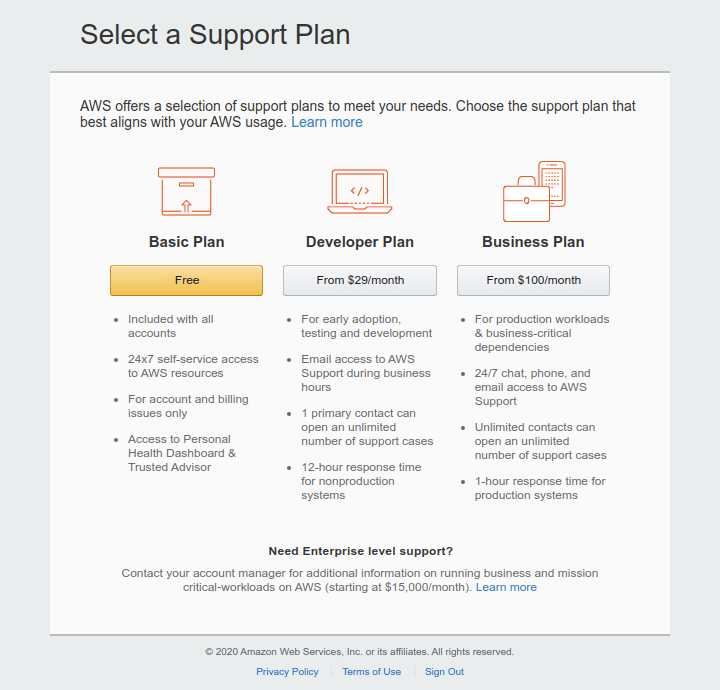
The last steps select a support plan, we decided “Basic Plan” for our test project.
Congratulations! We have completed the first step and are now ready to use Amazon web services. You will be able to access the AWS Management Console.
Reviewing Free Offers
AWS’s free offerings provide a wide range of services. Let’s focus on the services needed to set up a simple test environment and explore the advantages and limitations of these offerings.
Amazon EC2 (Elastic Compute Cloud):
EC2 allows you to create a virtual machine and install the operating system of your choice.
AWS EC2 provides a fantastic opportunity for you to create a test environment without any cost through the AWS Free Tier. This means you can experiment and try out different applications or software in a safe and controlled manner.
With EC2, you’ll have access to 750 hours of Linux and Windows t2.micro instances (or t3.micro if t2.micro is not available in your region) every month for an entire year.

To make the most of the Free Tier, it’s recommended to stick with EC2 Micro instances. These instances provide enough computing power for testing purposes while ensuring you stay within the Free Tier’s limits.
Please visit the page for more information.
Amazon S3 (Simple Storage Service):
It is an object storage service that you can use to store your files. You can store test data, log files or other static content here. As part of the free tier, you can get started with Amazon S3 for free. Upon sign-up, new AWS customers receive 5GB of Amazon S3 storage in the S3 Standard storage class; 20,000 GET Requests; 2,000 PUT, COPY, POST, or LIST Requests; and 100 GB of Data Transfer Out each month.

Estimate the cost of your storage solution. Configure a cost estimate that fits your unique business or personal needs with Amazon S3. Try out the AWS Pricing Calculator.
Here is more information about this page.
Amazon RDS (Relational Database Service):
Setting up and handling databases can be a daunting and costly task in the world of IT. Fortunately, Amazon RDS is here to simplify things for you! It takes away the complexity by automating numerous administrative tasks that are crucial but often time-consuming and repetitive.
These tasks include provisioning hardware, installing and patching software, managing storage, and even handling backups for disaster recovery.
We can use 750 hours of Amazon RDS Single-AZ db.t2.micro, db.t3.micro, and db.t4g.micro Instance usage running MySQL, PostgreSQL databases each month.
Please visit the page for more information.

The important point here is to remember that all these services have limitations and scaling. You need to scale your work accordingly.
It is possible to set up a simple test environment with the above services. If you need to use more services, AWS documentation is rich in this regard.
You can find more information on this page here.
The Adventure Begins: Creating the Necessary Resources for the Test Environment
It is important to identify the resources you need to build your test environment.
We decided this in the previous chapter and in this chapter, we will learn how to set up the services we decided on step by step.
Elastic Compute Cloud (EC2)
First of all, we need to have a virtual server, for this we need to use the EC2 service first. To access the EC2 management console, search EC2 and click service.
Some of the fields in the dashboard are as follows;
Resources is the area where we see all the EC2 resources we use, such as our running servers, Snapshots, Disk Volumes, and Security Groups.
Launch Instance directs us to the process wizard to create an EC2 instance.
Service health gives status information about the Region where you are running the EC2 service.
Availability Zone Status gives status information about all availability zones in the Region.
On the left side, we can see all the options related to EC2.
We select Instances from the left side menu and start setting up our EC2 server by saying Launch Instance.

Step 1: Choose an Amazon Machine Image (AMI)
In this option, we select the system where we will install EC2’s instance. As we mentioned about AIM, we have three options here (My AMIs, AWS Marketplace, and Community AMIs).
We will choose Community AMIs because of in this option, they are images that are available to everyone free of charge.
Step 2: Choose an Instance Type
Since we will be running a web server, we will choose the T2 server type and after selecting t2.micro, which is free, we continue with Configure Instance Details.
Step 3: Configure Instance Details
Number of Instances: We determine how many instances will be installed with this AMI. We will install one.
Network, Subnet, Auto-assign Public IP: We don’t have a Virtual Private Cloud (VPC) now, we’re leaving it at the default settings for now.
IAM role: We’re selecting the IAM role that our EC2 server will use. We chose the EC2_S3_FullAccess role that we created to allow access to S3 resources.
Shutdown behavior: Here, we’re specifying what action AWS should take if the EC2 instance is shut down. By selecting “Stop,” we can stop the instance, and by selecting “Terminate,” we can ensure that the instance is deleted when it’s shut down.
Tenancy: We’re choosing “Shared – Run a shared hardware instance.”
After configuring the instance settings, we proceed by clicking “Next: Add Storage“.

Step 4: Configure Add Storage
At this stage, we set the size and volume type for the root disk and add new disk volumes with the “Add a New Volume” option. We choose the 8GB size and General Use SSD(gp2) option and do not add another disk volume. We can also select IOPS SSD(io1) and Magnetic(standard) disk types. To proceed, we select “Next: Add Labels” to continue.
Step 5: Configure Security Group
This is the section where we make port and IP settings for security access for EC2 Instance. Since we will use a test environment on the web server, we will open the relevant ports in HTTP and HTTPS.
Step 6: Review Instance Launch
Instance Launch is the step to review the launch of the EC2 instance. In this step, you can review its configuration, network settings, disk sizes, IAM role and other related settings, and you can also review its summary information, cost estimates and other important information. After the review, you can click the “Launch” button to launch the instance.
Amazon S3 (Simple Storage Service)
AWS S3 or Amazon Simple Storage Service, is like having your magical cloud storage space where you can store and retrieve any type of data whenever you need it.
As part of the free offers, we will get a certain amount of free storage. Using S3, we can store your test data, media files or application files.
This service allowing you to easily upload, download, and organize your files.
Step 1: Create S3 Bucket
Amazon S3 consists of buckets. All stored data is defined as objects and these objects are stored in buckets. We can access S3 by typing s3 in AWS management console. Then we can click create bucket.

When creating an AWS S3 bucket, you need to consider the following requirements:
Bucket Name: You need to choose a unique name. This name will be a unique identifier for your S3 bucket.
Region: You need to specify the AWS region where the bucket is located. This determines the physical location where your data will be stored.
Access Controls: To provide access control to your S3 bucket, you need to set the appropriate permissions. This determines who can access the bucket and what operations they can perform.

Step 2: Data upload
Once the bucket is selected, click on the “Upload” button. You can choose one of two options to upload your files:
- Select files from your local computer using the “Add Files” option.
- Upload a folder using the “Add Folder” option and automatically upload the files in it.
After selecting the files, you want to upload, click on the “Upload” button. You can now monitor the progress of the uploaded files and once complete, the files will be transferred and stored in the S3 bucket
Step 3: Accessing data from outside
The URL you need to use to access the data in the AWS S3 bucket will be in the following format:
URL Format: [Bucket name].[region].amazonaws.com/[object name]
Example URL format;
Object Name: 0374d5e5-1f76-4fb0-added-c0099662573a
Region: us-east-1
Bucket Name: login-docs
URL: login-docs.s3.us-east-1.amazonaws.com/0374d5e5-1f76-4fb0-added-c0099662573a
Relational Database Service (RDS)
Log in to the AWS Management Console and go to the RDS service and open the RDS console. Click on the “Create Database” button.

The engines that can be selected for free use include MySQL Community Edition or PostgreSQL. We will choose MySQL.
After selecting the database engine, specify other details. These details include database name, username, password, database version, storage capacity, etc.
Select the appropriate network configuration for client access. This allows you to specify access permissions and security groups to the database.
Finally, review the cost estimates as well as customize the installation and create your RDS database by clicking on the “Create Database” button.
We will need to install a program for the visual interface to the database, for MySQL this program is called MySQL Workbench.

After downloading it to the computer, we can access our database from here according to the configurations on AWS.

Congratulations! Now we have a database we can use.
Amazon Route 53:
Amazon Route 53 is a highly available and scalable Domain Name System (DNS) web service. Route 53 connects user requests to internet applications running either in AWS or within an organization’s own infrastructure.
To create a free DNS connection using Amazon Route 53, you can follow the steps below:
1. Sign in to the AWS Management Console.
2. Go to the Route 53 service and open the Route 53 console.

3. Select “Hosted Zones” from the left menu.
4. Click on “Create Hosted Zone.”
5. Enter your domain name. For example, you can choose a domain name like “example1.com”
6. A new hosted zone will be created for the chosen domain, allowing you to manage your DNS records under this zone.
7. After the hosted zone is created, click on “Create Record Set” to add DNS records.
8. When adding DNS records, specify the resource name (e.g., “www”) and the target value (e.g., an IP address or another domain name).
9. Optionally, you can set the TTL (Time to Live) value. This determines how long the DNS records will be cached by others.
By following these steps, you can create a free DNS connection using Amazon Route 53 and manage your domain name routing. DNS records are used to associate your domain name with the relevant target, allowing users to be directed to your applications using the domain name. Remember to carefully review the free usage limitations and costs associated with the service.
Please visit the page for more information.
Test Environment Management and Monitoring
We can manage the resources you create using the AWS Management Console.
Using the monitoring part of the EC2 service, we can see the usage options of Instances.
We observe information such as disk usage, and CPU usage here.
Since AWS CloudWatch is a paid service, we did not install it. For this reason, the data here will be updated every 5 minutes.

To manage our server, we go to the instance in EC2, and there, in the instance state section, we can start, stop, and restart the instance running inside our server.
It is important to remember that there will be no going back after instance shutting down. You can find the Instance lifecycle in the image below.

You can easily delete resources with AWS Management Console. When you no longer use your test environment, it is important to delete and clean up resources. We can terminate the instance from within EC2. In S3 and RDS, you can also access and delete them via the console.
Key Takeaways
In this guide, you learned how to create a free test environment step by step. Starting with creating an AWS account, you’ve reviewed the process and limitations of signing up for free offerings. Then, you identified the resources you needed for the test environment and easily created these resources through the AWS Management Console.
This free platform is a great opportunity to try new technologies, develop projects and improve your skills. With the services offered by AWS, you can use Elastic Compute Cloud Service(EC2), Amazon Route 53, Simple Storage Service(S3), Relational Database Service(RDS) and more for free.
I also gave you tips on management and monitoring. You can manage your resources, monitor performance, and control costs using the AWS Management Console. I also emphasized the importance of deleting resources and backing up data when you no longer use your test environment.
Remember, the world of technology is constantly evolving, and major cloud services providers like AWS offer many opportunities to keep up with these developments. By using your free testing environment, you can take advantage of these opportunities and constantly improve yourself.
I wish you have great experiences!
Resources:
- https://docs.aws.amazon.com/ec2/?icmpid=docs_homepage_featuredsvcs
- https://docs.aws.amazon.com/s3/?icmpid=docs_homepage_featuredsvcs
- https://docs.aws.amazon.com/rds/?icmpid=docs_homepage_featuredsvcs
- https://docs.aws.amazon.com/AWSEC2/latest/UserGuide/monitoring_ec2.html
- https://aws.amazon.com/tr/route53/resources/
FAQ
An AWS Free Test Environment is a setup using AWS Free Tier services like EC2, S3, RDS, and Route 53, allowing you to build and test applications at no cost for a limited time.
Key services include Amazon EC2 (750 hours/month of t2.micro or t3.micro instances), Amazon S3 (5 GB storage + requests), Amazon RDS (750 hours/month for MySQL or PostgreSQL), and Amazon Route 53 for DNS management.
Visit the AWS website, click “Create Account”, complete the signup steps, choose the Basic Plan, and log into the AWS Management Console.
From the AWS Management Console, open EC2, click Launch Instance, choose a free-tier AMI, select t2.micro, configure instance details, add storage, set security rules, and launch.
Yes. Amazon S3 lets you store up to 5 GB for free, with limited GET and PUT requests. You can upload files via the console and access them through a public URL.
You can manage resources using the AWS Management Console. For EC2, monitor CPU and disk usage, start/stop instances, and delete unused resources to avoid extra charges.
Reading Time: 10 minutes
Don’t miss out the latestCommencis Thoughts and News.